Showing posts with label holiday. Show all posts

Saturday, December 7, 2013

Baby - It's COLD outside!

Ok, so I'm a bit of a wimp given that I live in the San Francisco Bay Area, and most days the weather rarely dips below 50, so when high 30's are expected we tend to freak out a little.

Since the house was so cold when I got home from work, I figured I would warm it up by baking some yummy treats, the first of which (yes, there were more than one) I'm sharing with you here.

Cranberry Orange Loaf - Allrecipes.com
It's not very often that I find a recipe that works perfectly as written, but this one did.  I originally made it just after Thanksgiving because I had all sorts of leftover ingredients that I wanted to put to good use.

Cranberry Orange Loaf

2 cups all purpose flour
1 1/2 teaspoons baking powder
1/2 teaspoon baking soda
1/2 teaspoon salt
1 tablespoon grated orange zest
1 1/2 cups fresh cranberries
1/2 cup pecans, chopped coarse
1/4 cup butter, softened
1 cup white sugar
1 egg
3/4 cup orange juice

Glaze (optional)

1/4 cup orange juice
1/4 cup powdered sugar

Grease and flour 9x5 loaf pan. Whisk together flour, baking powder, baking soda, and salt. Stir in orange zest, cranberries, and pecans - set aside.
In a separate bowl, cream together butter, sugar and egg until smooth. Stir in orange juice. Fold into flour mixture until just combined. Pour into pan.
Bake at 350 in a preheated oven for 1 hour, or until bread springs back when lightly touched.  Let sit for 10 minutes, then turn out onto wire rack to cool.  Pour glaze over warm loaf if desired.

I have made this with and without the glaze - it is nice to have, but not completely necessary.

I'll post my other cold winter night recipes soon!

Enjoy!


Thursday, November 21, 2013

Thanksgiving Greetings

I know it is a week early - but you have to get those cards in the mail if you want them to arrive on time!

Sorry for the poor photo quality - I need to check my images better before I send off the finished product.

Silhouette images, leaf craft punch, rubber stamps from my Mom's collection
Hoping your Turkey Day is stress free and full of gratitude and love.

Thursday, October 31, 2013

Happy Halloween!

A treat for my little tricksters - 


Here is the progression, with a couple of lessons learned:
I used Wilton decorative icing for the face and binder on the "bones".  The brownie recipe is "Nutella Pretzel" from  Chef-in-Training.  The brownies are great, but next time I will use an unfrosted version as they were difficult to put in the bags cleanly.

My trusty Silhouette for the tags.

Had some extra skulls, so I just dropped them in along with the secured bodies.  Using skewers was essential to keep everything in line.
Have a wonderful time tonight, and may many Twix bars be in your future!

Wednesday, October 30, 2013

Halloween - My favorite time of year

It begins with lots of spooky fun and ends with a candy coma - not to mention my card making season.

Here is what I sent out this year.  I ran out of the "halloween" background paper, so there were two versions - which do you like best?

Option 1
Option 2 - inside

Option 2 - front


Wednesday, January 11, 2012

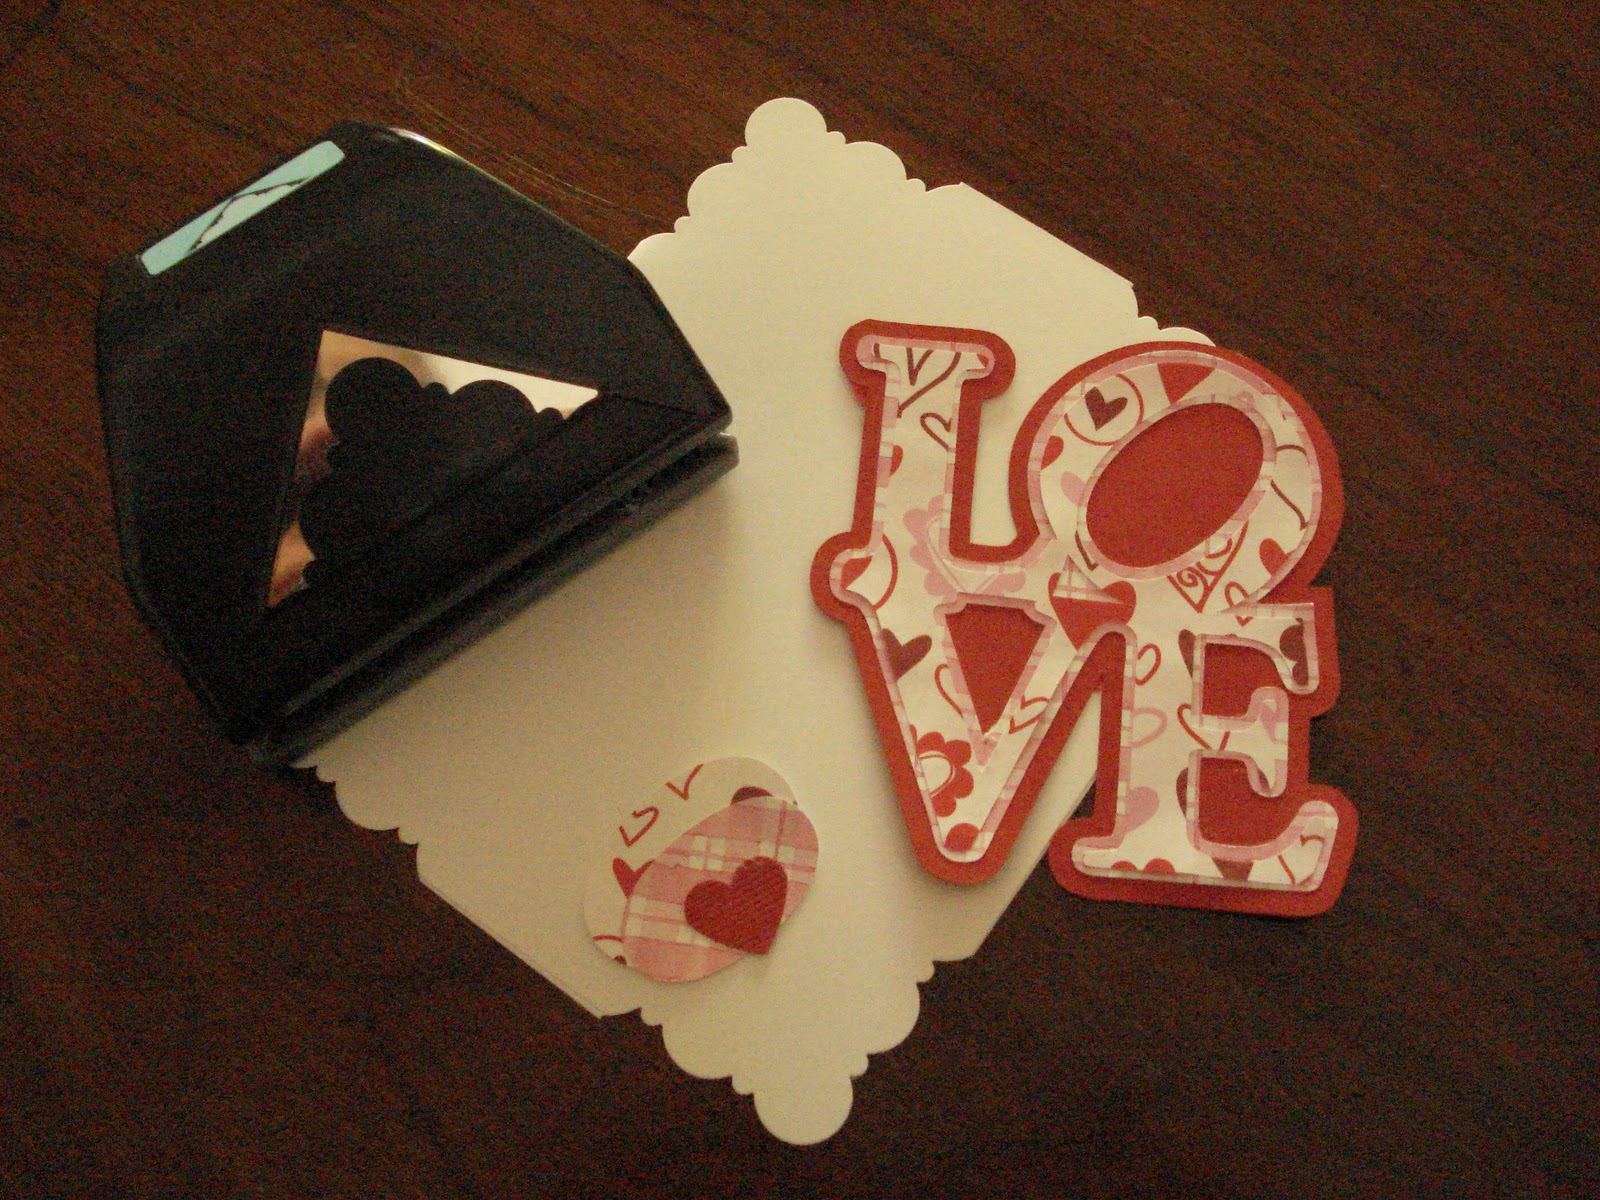
Valentine's Day Card


I am so loving my Silhouette SD!  I know the Cameo version has come out, but I still seem to be able to do everything I want to with this early version.

Here is the progression of pieces I put together.


And the detail for the base card.


Hope you have fun putting together you Valentine's Day cards!  Send me a photo and I'll post them here to share with everyone!

Happy Crafting!

Saturday, December 31, 2011

New Year's Eve

In keeping with our family tradition, tonight will be spent working on puzzles, playing games and eating hors d'oeuvres.

I wanted to share with you one of my son's favorites - the reason this one is so great is if there is any left overs, you can easily make ravioli pasta for dinner tomorrow!


Bacon and Tomato Cups

8 slices bacon
1 cup chopped tomato
3 scallions, thinly sliced
4 oz shredded Swiss Cheese
1/2 cup mayonnaise
1 tbsp chopped basil
Won won wrappers

Preheat oven to 375 degrees.  Brush both sides of a won ton wrapper lightly with vegetable oil and press into a mini muffin pan.  Bake for 8 minutes or until light golden brown.  Cool on a wire rack while preparing the filling.

In a skillet over medium heat, cook bacon until evenly brown.  Drain on paper towels.

Crumble bacon into a mixing bowl, and mix with tomato, scallions, cheese, mayo and basil.

Place a baked won ton wrapper back into each of the mini muffin pan cups and fill with 1 tablespoon of the filling mixture.

Bake for 10 to 12 minutes, or until the filling has melted through.  Be careful not to let the won ton cups burn!

Like I said, if you have left over filling and uncooked won ton wrappers, use them for ravioli!

I originally found this recipe on AllRecipes.com, but tweaked it just a bit for work better for my family.

Monday, December 26, 2011

Thank You Card

In the spirit of giving - and therefore receiving - I made a Thank-you card to send out to my family.

I am having so much fun with my Silhouette SD!  In the spirit of trying to use up what I have before going out to get more, the flowers turned out a bit "spring-y", but cute none the less.

Below are the materials that I used for the card.  I have to say, once I started putting them together, it was so much fun!  I even have flowers leftover for some other time - Perhaps to put on a package?

Sunday, December 25, 2011

Happy Holidays

Wishing you and yours the Merriest of Holiday Seasons

Looking forward to sharing with you in the coming year.

Saturday, December 24, 2011

Yummy Canine Treats!

Today is my day of Holiday Baking!
 
Not to leave our our four-legged friends, I have made these treats for the neighborhood pooches for years now.  The recipe was originally produced in Gourmet Magazine December 2005.  
 
 
Dog Biscuits
Photo: Romulo Yanes
 
 Dog Biscuits
  • 1 1/4 cups all-purpose flour
  • 1 1/4 cups whole-wheat flour
  • 1 1/4 cups cornmeal
  • 1 1/4 cups old-fashioned rolled oats
  • 1/2 cup toasted wheat germ
  • 1/2 cup packed light brown sugar
  • 1 tablespoon baking powder
  • 1 1/2 teaspoons salt
  • 1 1/2 sticks (3/4 cup) cold unsalted butter, cut into tablespoon pieces
  • 1 cup plus 1 tablespoon water
  • 1/2 cup chopped fresh flat-leaf parsley
  • 1/2 cup chopped fresh mint leaves
  • 1 large egg
Pulse flours, cornmeal, oats, wheat germ, brown sugar, baking powder, and salt in a food processor until combined. Add butter and pulse until mixture resembles coarse meal with pea-size butter lumps. Add 1 cup water and pulse until a coarse, dense dough forms.
Turn out onto a lightly floured surface and knead in parsley and mint until well distributed. Gather, then halve dough with scraper. Form into 2 balls and flatten each into a 6-inch disk.
Put oven racks in upper and lower thirds of oven and preheat oven to 350°F. Grease 2 large baking sheets.
Roll out 1 disk of dough into a round (1/3 inch thick) on a well-floured surface with a well-floured rolling pin. (If dough becomes too soft to roll out, wrap in plastic and chill until firm.) Cut out as many biscuits as possible and arrange about 1/4 inch apart on 1 baking sheet.
Gather scraps and reroll, then cut out more biscuits. Repeat with remaining dough, using other baking sheet.
Whisk together egg and 1 tablespoon water. Brush biscuits with egg wash and bake, switching position of sheets halfway through, until tops are golden brown, about 35 minutes total. Turn off oven and dry biscuits in oven overnight.

Read More http://www.epicurious.com/recipes/food/views/Dog-Biscuits-233290#ixzz1hTzWUu5i
 
I hope you enjoy making them and giving as gifts as much as I have.

Saturday, December 10, 2011

Holiday Card and Tags

I love making my own holiday cards every year.  This time around I was able to use my Silhouette SD to make a really fun - kind of retro looking card.


I was also able to use leftover cuts to make gift tags - also very fun I think!

Send me copies of your creations and I'll post them here for inspiration!

Thursday, December 8, 2011

Christmas Ornament... again

I wasn't really happy with the original ornament I made, so I saw something similar to this and thought it might be cute.


I used the cork from a bottle of wine we had at Thanksgiving, and I'm going to send it to my dad who was there, and is in desperate need of ornaments!

Wednesday, December 7, 2011

Christmas Cookie


Cranberry Pistachio Cookies

1 cup sugar
1 cup unsalted butter
1 large egg
2 tbsp milk
3 cups sifted flour
1 tsp baking soda
1/2 tsp salt
2 tsp vanilla
1 package (3.4 oz) instant pistachio pudding mix
1 cup chopped pistachio nuts (shelled - of course)
1/2 cup chopped dried cranberries

Cream sugar and butter.  Beat in egg, milk and vanilla/  Add sifted flour, pudding mix, soda and salt.  Stir in pistachios and cranberries until combined.

Drop by rounded tablespoons onto cookie sheet and flatten slightly with your fingers.


Bake in a 350 degree oven for 9-11 minutes.  Be sure not to over bake. 
Let cool 2 minutes on cookie sheet before moving to rack to cool completely. 
Store in an airtight container.  Makes about 4 1/2 dozen.


This recipe was originally from Betty Crocker (http://www.bettycrocker.com/recipes/cran-pistachio-cookies/e36c24c7-851f-4785-8a9e-13672ef9d97c#?st=6&term=pistachio&ps=9&pi=9&fv=AND%28HasGridViewImage%3ATrue%29 ) using their sugar cookie mix.  I decided to try it using my mom's sugar cookie recipe and adding the additional ingredients.  I really liked the way they turned out and although a bit on the salty side right out of the oven, they seemed to mellow overnight.

Tuesday, December 6, 2011

Holiday Shopping - Punjammies!

I came across a site which sells the most adorable "Punjammies".


LOVE all the patterns and had the hardest time deciding which to buy - I think both my sister and my aunt would love them - but I have all of their Christmas gifts purchased for this year, so I decided to buy a pair for myself and see how the fit is, and then go back and buy more!

Punjammies are sold by International Princess Project ( intlprincess.org ) and the description on the website reads:

PUNJAMMIES™ are made by women in India rescued from forced prostitution seeking to rebuild their lives. Proceeds from the sales of PUNJAMMIES™ provide fair-trade wages, savings accounts, and holistic recovery care.

The Capri style runs about $35 and if you use the promotional code: SHAREHOPE - you get free shipping during the month of December.

I love the mission statement of this company and I am really looking forward to receiving my Punjammies!  I'll keep you posted when the arrive - 

Share Hope this Holiday Season!

Thursday, December 1, 2011

Holiday Shopping


I have been out shopping the past few days just for some little odds and ends to add to my Christmas decorations - and possibly gifts.  What has really disturbed me is the lack of American made products for sale in the stores I visited:

Paper Source - I don't think ANYTHING was made in the USA - every item I picked up had been made in China

Sur la Table - Had great things that I would have loved to buy - a garlic rocker from Joseph Joseph, double-walled glassware from Bodum and an electric hand mixer from Cuisinart... all made in China

Pier1 - I know that "Imports" is part of their name, and I was able to find some candles and decorative tiles  (Vietnam) which I did purchase

It got me to thinking about trying to be more "local" in all of my spending - but the harsh reality is that some things that you want are only made overseas (my Silhouette SD machine for one).

I'm not saying that you shouldn't buy items made in other countries, just that if you have a choice, I believe it best to purchase those locally produced.

Monday, November 28, 2011

Christmas Ornament

Every year I do a homemade Christmas ornament for my parents, grandparents and close family friends.  Here is my offering this year - not my best, but I still think it turned out OK.  I think the message here is - "Go ahead and give it a try!" It really helps you get into the Spirit of Giving!
The finished product

The items I used to create it - I used things already in my collection of crafting goodies, but I did buy the paper ornaments (made in the Philippines) and the napkins (made in the USA).